Time Tracking (TERMS 2.0) Mobile App
The mobile app was designed exclusively for Timesheet Reporters (usually providers). It does not support administrative or approval functions.
The mobile app is called Time Tracking, and it’s available on the App Store and Google Play.
You can watch a training video for the mobile app here.
What can you do in the app?
Add time to your timesheet.
Edit your time on an existing timesheet.
Delete time from your timesheet.
Copy a previous time entry.
Make comments and add attachments on your timesheet.
Certify your timesheet.
Basics
How to Log In and Out
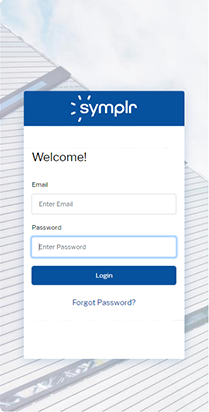
On your device, tap the Time Tracking icon to open the app.
The first time you log in, enter the Customer name provided to you by symplr Contract.
(This information will be retained for future logins.)
To enable biometric sign-in for future logins, switch the Sign in using biometric toggle ON.
Tap Login.
Enter the email address that serves as your user name.
Enter your password. This is the same password you use for the web app version of symplr Contract Time Tracking.
Tap Login.
To log out, tap your persona coin in the top right corner, then tap Logout.
If you’ve forgotten your user name or password, just tap the Forgot Password? link below the Login button.
If you reset your password on the mobile app, your password for the web app version of symplr Contract Time Tracking will be reset as well.
How to Navigate the App
To open a timesheet, tap it.
To go to timesheets for a specific month and year, tap JUMP in the bottom right corner, scroll to the month/year you want, then tap Go.
To access the user guide, tap your persona coin in the top right corner, then tap Get Help.
To see your Approvers’ and Financial Reviewers’ contact information, open a timesheet, then tap Approver Contact Info (under Certify). Tap a name to copy the user’s email address.
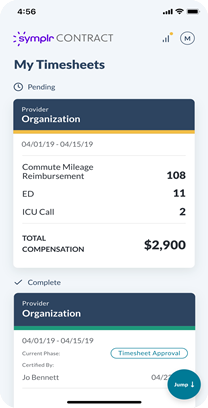
Timesheet Status
Upon login, you’ll see your timesheets. The timesheets are separated by status: Overdue | Pending | Locked | Completed.
Timesheets in the Overdue section have passed the last day of the reporting period.
Timesheets in the Pending section have not been certified.
Timesheets in the Locked section have passed the certification deadline (if applicable).
Timesheets in the Completed section have been certified and are awaiting approval.
How to Request that Your Timesheet be Unlocked
To request that a timesheet be unlocked, a user must have the role of Timesheet Reporter and be the reporter for a particular timesheet.
Tap the timesheet that you want unlocked.
Tap Contract Admin.
A new email will open with the Admin’s email address auto-filled in the To field so that you can email the Admin about getting your timesheet unlocked.
Once an Admin unlocks a timesheet, the Timesheet Reporter will be able to add, edit, and delete time entries, as well as certify the timesheet within the mobile app.
Time Entries
How to Add a Time Entry
Tap a timesheet to open it.
Tap the + next to Entry.
If you’d like to change the department or activity, tap the caret next to the currently selected item, then update the item.
OR
Tap an activity, then in the Activity View, tap + Entry.
To select a different date, tap the Date field, then select a date in the calendar widget.
(The date will default to today’s date, or if the timesheet ends in the past, the last date on the timesheet.)Enter the number of units (hours, etc.)
If applicable, enter a description.
When finished, tap Save.
To return to the timesheet without adding a time entry, tap the back arrow in the top left corner.
How to Edit a Time Entry
Tap a timesheet to open it.
Tap an activity to see its time entries.
Tap the time entry you want to edit.
Edit as needed, then tap Save.
How to Copy a Time Entry
Tap a timesheet to open it.
On the time entry you want to copy, tap Copy Previous Day.
In the confirmation modal, click Continue.
To exit without copying the time entry, click Cancel.
(The date will default to today’s date, or if the timesheet ends in the past, the last date on the timesheet.)
How to Delete a Time Entry
Tap a timesheet to open it.
Tap an activity to see its time entries.
Tap the time entry you want to delete.
Tap Delete.
Use caution when deleting a time entry, as there is no confirmation modal and it cannot be undone. If you erroneously delete a time entry, enter a new one.
How to Certify a Timesheet
Tap a timesheet to open it.
Review your time entries, as well as any attachments and comments, for accuracy.
Tap Certify.
Review the certification text.
When finished, tap Certify Timesheet.
To return to the timesheet without certifying, tap Cancel.
Comments
How to Comment on a Timesheet
Tap a timesheet to open it.
Tap the + next to Comment.
At the bottom of the screen, enter your comment.
When finished, tap the paper airplane icon.
To return to the timesheet without leaving a comment, tap the back arrow in the top left corner.
Comments cannot be edited or deleted in the mobile app. To edit or delete your comment, open the timesheet in your browser.
How to Reply to a Comment on a Timesheet
Tap a timesheet to open it.
Tap the reply icon next to the comment.
At the bottom of the screen, enter your comment.
When finished, tap the paper airplane icon.
To return to the timesheet without leaving a comment, tap the back arrow in the top left corner.
Attachments
How to Add an Attachment to a Timesheet
Tap a timesheet to open it.
Tap the + next to Attachments.
Depending on what file type you’d like to add, tap Add Image or Add File.
Select the file you want to add.
Enter the Preferred Name of the file.
OPTIONAL: Enter a Description.
When finished, tap Save.
To return to the timesheet without adding an attachment, tap the back arrow in the top left corner.
If the attachment does not appear on the timesheet, you may need to refresh the the screen by dragging your finger downward.
How to Edit an Attachment
Tap a timesheet to open it.
Tap the ellipsis (...) next to the attachment you want to edit.
Tap Edit.
Edit the Preferred Name and Description as needed.
When finished, tap Save.
To return to the timesheet without saving your changes, tap Cancel.
How to Delete an Attachment
Tap a timesheet to open it.
Tap the ellipsis (...) next to the attachment you want to delete.
Tap Delete.
Use caution when deleting an attachment, as there is no confirmation modal and it cannot be undone. If you erroneously delete an attachment, add it again.
Additional Info
Activity Groups appear alongside applicable Activities on the Overview screen, Entry Details screen, and Activity View screen.
Activity Groups are formatted as Activity Group Name - Activity Name.
The Certification Deadline appears on the timesheet. If the date is within 30 days, the Days to Certify field will also be displayed.
The Timesheet Type field will appear on the Overview screen.